How to Create a Customized Course Menu in LearnWorlds
In this guide, you will learn how to create a tab navigation within a course page. You will also be presented with 2 different designs to find the best style for yourself.

When it comes to filtering courses in LearnWorlds, the system could use some improvements as the filters browse through all the customer-facing products, and not only through the courses that you'd like to recommend.
Luckily, there is a workaround you can put together with a little bit of effort that will make your course page look professional. The steps are simple: categorize your courses accordingly, create a few pages dedicated to specific filters, and add the same tab navigation to all of them.
This video presents the end product that has 1 navigation and 2 different types of course pages.
If you're up for the task, let's get right into it!
Step 1 - Categorize your LearnWorlds Courses
For the sake of this example, I have created 2 categories, but you can have more. To label your courses, you will need to go to Courses > Course Manager and select the course you want to add the category tag to. On the same left side menu, go to Course setting > General and scroll lower into the page to reveal the Course Category area.
Disclaimer: Please keep in mind that tags are key-sensitive, and you'll need to merge them in the Tag Management area if you've created multiple variations by mistake.
Step 2 - Create Custom Pages for All the Categories You Wish to Display
After assigning categories to courses, now it's time to create a dedicated page for each and every one of those categories. Go to Website > Edit Website > Pages and click the green '+' button to reveal the Create Page menu. Since we want all our course pages to have the same architecture, select the Blank option and fill in the required information. Remove the 'blank' group and instead create a new tag 'My courses pages'. Repeat this procedure for all the categories you have left and assign them all to the newly created group.
I did not create a new tag in the video above, and instead used the 'Courses' category, but I recommend that you create a new one.
Step 3 - Create the navigation
Let's start on the /courses page. To create the navigation, you will need to add anywhere, but preferably in the first section of the page, a Tab widget. Customize the tabs in the right-side menu however you desire before proceeding to transform them into functional buttons. Save your changes and let's start to modify the code behind the tabs to create our custom navigation.
Click on any of the tabs (not on the text, but right on the outside of the text area) and head to edit HTML. I recommend you have your list of pages that were created at Step 2 in a separate tab to have an easier time obtaining the information you need.
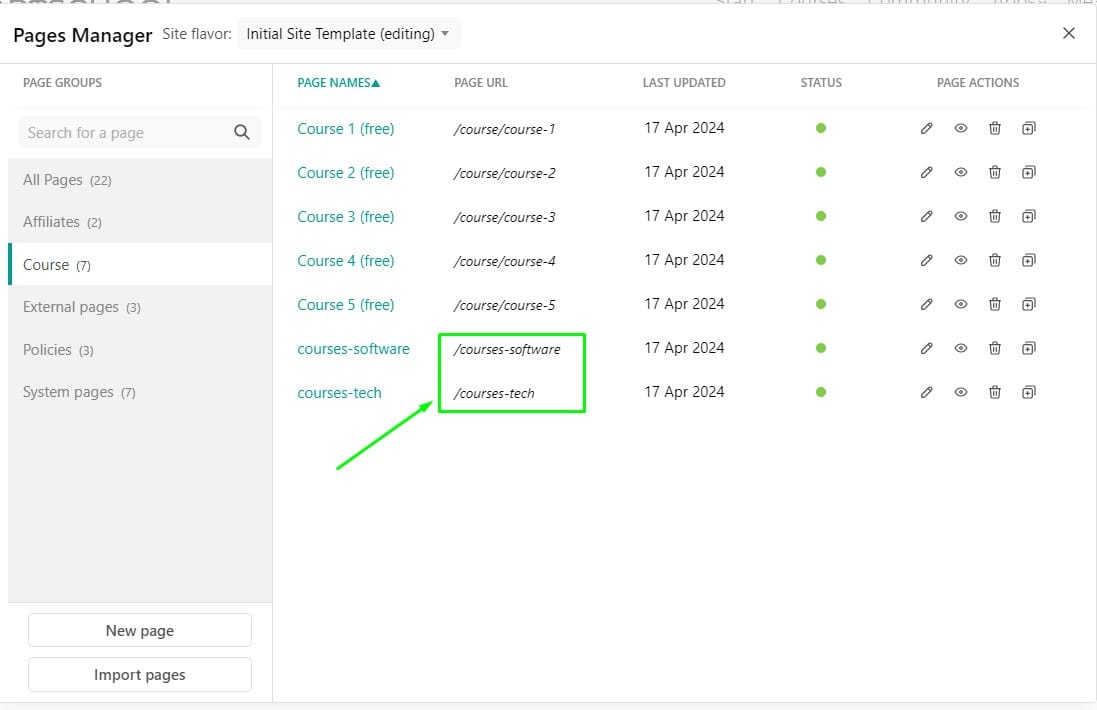
In the page category, we will need the page URL, which looks something like /xzy. For my case, I have /courses-software and courses-tech but yours can look a lot different.

Now, for editing the HTML, we will need to identify the string that contains the name of the Tab.

Once identified, we will remove <div at the beginning of the sequence and replace it with <a href="/CoursePageURL" style="text-decoration: none". You will also remove </div> at the end of the string and replace it with </a>. You will use the course URL from the Page list, as indicated above.
In my case, the code sequence for the Software tab would start with <a href="/courses-software" style="text-decoration: none" and it would end with </a>. Please refer to the picture below for a visual representation.

Important: Do not forget to hit the 'Update' button to save the changes.
Now, to give you an explanation of why we're adding this code:
<a href="/CoursePageURL" - indicates to the system that the button is going to redirect the user to a different page
style="text-decoration: none" - removes the underline that usually appears when a text has a link attached to it
</a> - closes the sequence and notifies the system that these are all the modifications brought to the button. HTML code strings need to always end with the letter/letters they started (eg: <a> and </a>; <div> and </div>, <p> and </p>)
Here are the steps I took to reshape tabs into clickable buttons
Step 4 - Implement the Same Navigation for All Pages You Have Created
It's been quite a rollercoaster, but we're close to the end now. All it's left to do is to return to the list of pages and find in there the page you've been working on. In my case, the page is called 'Courses'. Hover on the 3 dots on the right side of the name and select 'Copy all sections'.

Then navigate to one of the blank pages that you have previously created and click on it. Once opened, return to the list of pages and click on the 3 dots on the right of the page title. Select 'Paste all sections'.

Unfortunately, when you clone the sections from one page to another, the modified code we have applied will not copy to the new page. This means that you will need to repeat the steps from Step 3 and add the same code to all pages.
Recommendation 1: Do not modify the <div string of the Tab that matches the current page the user is on. Example: my user is on the Software page. All the other tabs start with <a href in the picture below, with the exception of the tab that corresponds with the page I am editing.

Recommendation 2: If you're looking to have a menu on all pages, in order not to mislead the user with different tab colors, set up the same background color for all buttons for both Tab Appearance and Active Tab Appearance.

Recommendation 3: Does your text show blue (hyperlinked) in the buttons? Modify the color by adding a bit more code. Add color: black (or white, or whatever you want) as in this example: <a href="/CoursePageURL" style="text-decoration: none, color: black". For example, my Software button will have the string <a href="/courses-software" style="text-decoration: none; color: black".

Are you looking for a simpler alternative that does not have the menu on all pages?
Writing code is not something most of us are very familiar with. If you only want to have the menu on the All Courses page, we can design something different for all the other dedicated pages that will look like this:

Pretty cool, right?
In order to create this, here are the steps I took:
- Open the page
- Add a Hero Section (I went for the blue one, first position on the last row)
- Remove the Automatic Button
- Add New Regular button
- Customize the button and move it to the top of the text
- Click on the button and go to Actions > On click > Page > Courses
- Change the text in the Hero Section
- Add new Section > Products > Choose the widget of your liking
- Remove title
- Hover over the courses and click on Edit Course Cards
- In the right-side menu Show Courses > By Category
- In the same right-side menu, scroll lower to Filters and Display Filters > No
All steps to create a custom courses page
This is all folks. I hope that your course menu turned out great regardless of the paths you took.
Do you need some extra help? Know that you can always reach out to us to create the best version of your school.
