
Unlock the Power of LearnWorlds: Mastering Tags for Enhanced User Engagement and Data
Want to find the easiest way to manage your users? In this guide you will learn how to label your accounts and how tags will ease your workload.
We've all likely noticed the welcome improvements to the tagging system in LearnWorlds. I recently had the privilege of attending a webinar showcasing a multitude of powerful ways to leverage these tags, from sophisticated data capture to precise user categorization. While not everyone could attend, I'm thrilled to share my insights so you, too, can use LearnWorlds tags proficiently and unlock their full potential for your online school.
What Are LearnWorlds Tags? Understanding the Foundation
Before we dive in, let's establish a solid understanding of what LearnWorlds tags truly represent. In essence, a tag serves as a robust tool for categorizing your users based on a variety of attributes you define. These can range from their specific interests, geographical location, or role within a company, to any defining term that facilitates the successful classification of distinct user groups. Mastering this fundamental concept is key to leveraging the full power of LearnWorlds for user segmentation.
How to Use Tags in LearnWorlds: Strategic Approaches
There are numerous strategic approaches to kickstart your LearnWorlds tagging strategy, each tailored to your specific objectives. Are you, for instance, interested in pinpointing the geographical location of users accessing your school? While manual assignment based on login information is possible, prompting users to select their country upon account creation presents a more efficient alternative. Similarly, to gather valuable insights into user preferences for future course and product recommendations, you can systematically collect and tag information throughout their learning journey—from their initial sign-up to their ongoing interactions. Let's explore together the various methods in which you can make use of this amazing feature, beginning with:
How to Add Tags in LearnWorlds
Manually Adding User Tags: To manually add tags to individual users, begin by navigating to the "Users" section on the left sidebar. Click on "All users" to access the complete list of accounts in your school. Next, utilize the search bar to quickly locate the specific user you wish to tag.
Once you've found the user, hover over their name and click the "Edit" button that appears on the right side of the row. This action will open a sidebar on the right of your screen. Within this menu, find the field labeled "User tags" and type in the desired tag. Press "Enter" to add the tag, then click "Save" to apply the changes.
Remember: Tags are case-sensitive, so ensure consistent spelling to avoid creating duplicates.
Bulk Tagging Users for Efficiency - If you have several users requiring quick labeling, LearnWorlds offers two efficient methods. You can either use an Excel file within the "Users" tab or leverage the "User Segments" feature to filter and tag them.
To quicken the process of adding or updating tags using an Excel file, navigate to the "User" section and select "All users." In the top bar, hover over "Bulk actions." From the dropdown menu, choose the "Tag Users" option. This will open a sidebar on the right. Here, you'll find a green button to download a template. Once downloaded, populate the template with the email addresses of the users to be tagged and their corresponding tags. Finally, upload the completed template to apply the tags to the specified users.
Leveraging User Segments for Bulk Tagging - What about the other option for bulk tagging users? If you need to tag a group of students based on specific filters available in LearnWorlds, follow these steps: Navigate to "Report Center" and choose "User segments." From here, you can filter the users you need to label. Once filtered, direct your attention to the top bar and select "Add tag." Important Note: In this section, you cannot create new tags directly. You'll need to create these new tags beforehand in the "Tag directory," located within the "Users" tab. By organizing your users through filters and utilizing the "Add tag" option, you can efficiently manage your user base according to any specific criteria.
How to Automate Adding Tags in LearnWorlds: Streamlining Your Workflow
Automated Tagging During Account Creation - The process of adding tags doesn't have to be separate from account creation. You can seamlessly integrate it into the signup process by creating custom fields in your signup form. This allows user responses to automatically trigger the creation of relevant tags. For example, if you want to tag users by country, you can add a question asking about their location during account creation.
To implement this structure, follow these steps:
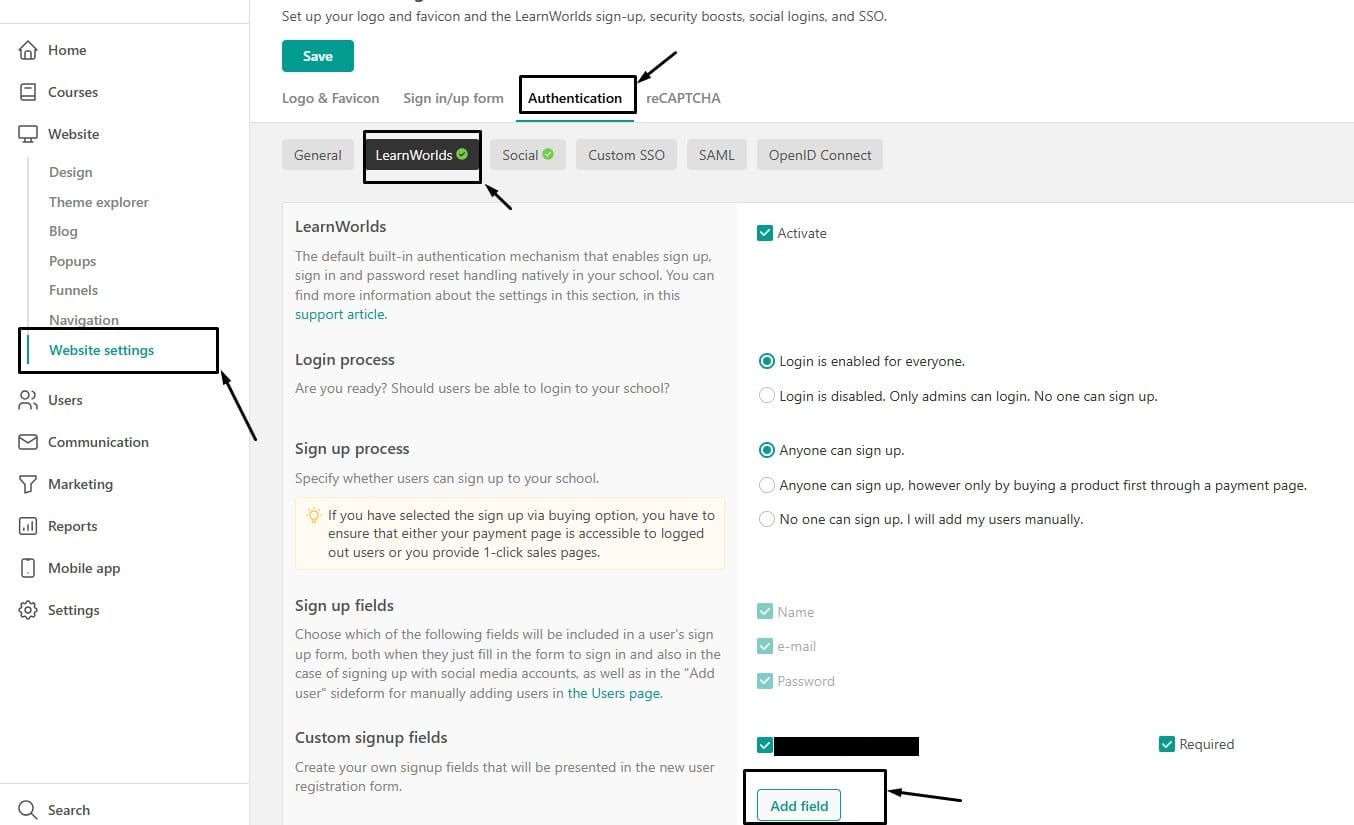
- Navigate to 'Site builder' > 'Sign in/up.'
- Change tabs from General to LearnWorlds at the top to reveal settings for the native signup form.
- Look for the fifth field on the page, called Custom Fields.
- Next to it, find a button that says 'Add field.' Click on this button to start creating your custom question.
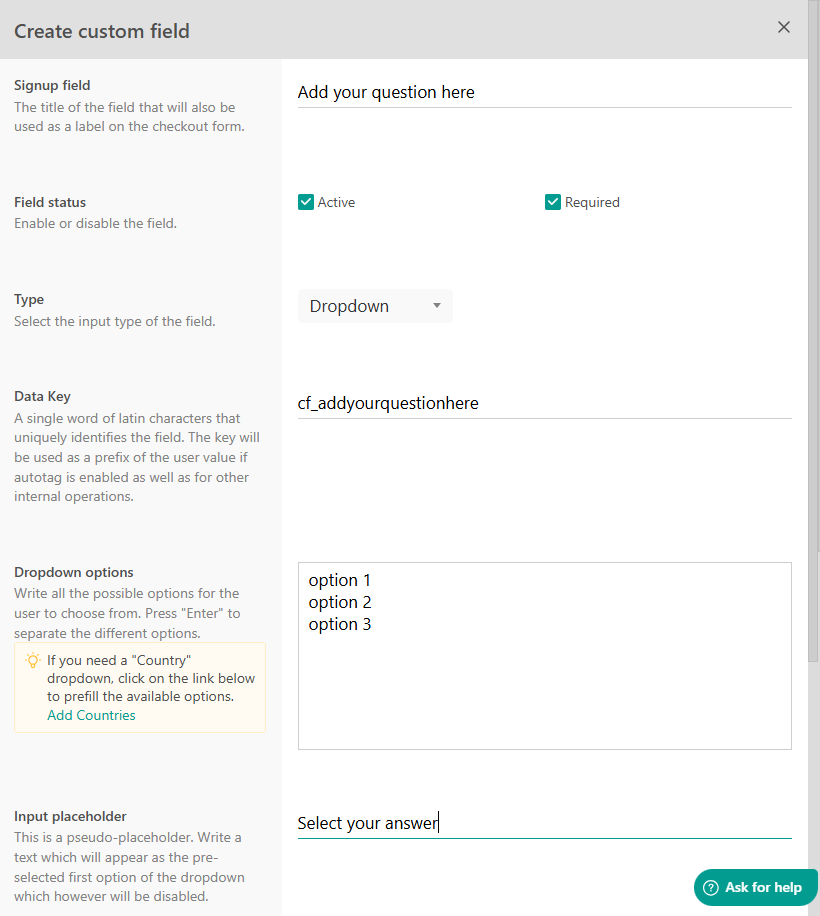
- Make sure to checkmark the 'Active' field and the 'Add user input as a tag to the user profile' option at the bottom before activating the question.
Consideration: Tags can only be automatically enabled if the question has a closed answer type, such as Dropdown, Checkbox, or Radio Buttons. By seamlessly integrating tags into the signup process, you can efficiently collect valuable information from users and categorize them based on specific criteria right from the start.
Important! Tags generated using this method will only show up in the school when at least an account was created with the specific option. Please keep this in mind if you're planning to use custom navigation or conditional visibility, as you'll need to create dummy accounts to generate the tags first.
Example: You have the signup question "Where are you from?". If none of the 196 country options have been selected by a user during signup, no corresponding tags will exist. If a user chooses "Japan," a tag with the format cf_whereareyoufrom_japan will be created.
Automated Tagging Through LearnWorlds Automation - some time ago LearnWorlds introduced its powerful automation feature, a truly invaluable addition. This feature significantly simplifies processes. You simply define a trigger (if the user does X) and a follow-up action (then Y happens). For our topic, a prime example is: if a user enrolls in the XYZ course, then a relevant tag is automatically added to their profile. Furthermore, you can add conditions to refine when the follow-up action occurs, such as applying the tag only if the user hasn't purchased any course previously.
The automation feature boasts numerous applications. To activate it:
- Navigate to the 'Users' section and select 'User Automations.'
- Click on the button located at the top called 'Create automation' to trigger a new worksheet.
- In the pop-up window that appears, you'll find a range of templates designed to automate various tasks. You can pick a tagging template to quickly implement common automation workflows.
- Alternatively, if none of the templates suit your needs, there's the blank canvas option that allows you to design your custom automation. Here, you have the freedom to experiment and create your unique mixes.
- Once you've made your selection, follow the prompts to configure and activate your chosen automation.
With this feature, you can streamline a big part of the user management process and maximize efficiency in your LearnWorlds school.
Tagging Based on Specific Answers to Questions or Forms - While quizzes and forms serve different primary purposes, they share a similar mechanism for adding tags. For both, open the file, navigate to the questions you want to enable tagging for, and hover over the upper part of the question text to reveal the "Edit questions" option in the top right corner of the dotted border. Click on it and move to the right-side menu bar to the "Tags" tab. Here, you can add, remove, and edit tags that will be applied to the accounts of users who select the specific answer to which the label is added.
An additional layer of tagging can be implemented to tag all users who complete the assessment or form. To do this, navigate to "Settings" in the top right corner of the dashboard and select "After submit" from the dropdown menu. In the pop-up window, scroll down to the "Tag upon submission" area and enter the desired label.
Important Note: Tags can only be added to questions with predefined answers, as open-ended questions would create inconsistencies and management challenges.
Tagging Through Qualification Forms - Similar to standard forms, qualification questions are surveys designed to assess your users' intentions within your school. Whether they're taking courses for leisure, career advancement, or due to workplace requirements, you can collect this valuable information by activating Qualification forms. To enable this survey for users immediately after account creation, go to "Marketing" > "Qualifications questions" and turn the feature on. Directly below the activation checkbox, you'll find the "Edit Questions" button, positioned above the "Tag users" area, which allows you to tag all users who complete the survey. Click the "Edit Questions" button and hover slightly above the question text to reveal another "Edit Questions" button with a black background. Clicking this will open a right-side sidebar where you can find the "Tags" tab and assign specific tags to each available answer option for your users.
Leveraging Custom Payment Fields for Tagging - This is a particularly insightful technique! While the platform offers a general option to tag all users who have made at least one purchase by going to the "Payment" page, clicking on the "Payment Method" area, and adding labels in the "Add tag" area of the right sidebar, what if you want to tag users based on each specific course they buy? While Automations offer this capability (on higher-tier plans), there's a workaround for those on other plans. Navigate to the layout page of the specific course (this can also be applied to bundles or subscriptions). Hide the default "Enroll" button from users who don't yet own the course by clicking on the button, going to the "Actions" tab in the right sidebar, and editing the element's visibility to "Enrolled users." Then, add another button beneath the hidden "Enroll" button by hovering over the desired placement area and clicking the plus icon. Set the visibility of this new button to "Unenrolled users" using the same steps. Crucially, within the same "Actions" tab, slightly above the visibility settings, configure the "On click action" to "Scroll into the page" to a section where you will embed a payment portal. Now, instead of redirecting to a separate payment page, the payment process occurs on the same page, allowing you to label users who have purchased this specific course (those who complete the checkout from this embedded section). Setting up the tags is straightforward: add a new payment section where your new button directs, click on the "Payment Method" area within that section, and add your desired tags from the right sidebar.
While you can also set up tags using features like Seat offerings and User groups, these are more specialized and generally intuitive to use. The methods discussed today represent some of the less obvious but highly effective ways to add tags in LearnWorlds. I hope this guide provides you with a deeper understanding of how to apply tags strategically. Personally, discovering some of these techniques was eye-opening, and I can envision numerous scenarios for leveraging them to their full potential. While I may not have uncovered every single possibility, I believe this guide brings us significantly closer to mastering the art of using LearnWorlds tags.
Bonus - How to Manage Your LearnWorlds Tags Effectively
After such a comprehensive exploration of adding tags, it's essential to discuss how to manage them effectively. You might need to repurpose and rename a label or merge two similar tags. All of this is possible within the "Manager" tab. Simply go to your LearnWorlds Dashboard and navigate to "Users" > "Tags." Here, you can "Edit," "View the usage" of, and "Delete" individual tags. Furthermore, by selecting two or more tags, you can perform bulk actions like "Delete" or "Merge" them, streamlining your tag organization.
That concludes our deep dive into LearnWorlds tags! I sincerely hope this information proves valuable and helps you enhance your LearnWorlds school. Until our next exploration of LearnWorlds features, farewell! 👋